Managing your Google Ads Display placements
A script for managing your Display placements, and stopping Google from serving your ads on junk.
The problem
Google Ads often serves ads on low quality websites and YouTube videos. For example:
- Serving ads on non-English placements, when targeting English speakers.
- Serving ads on junk content, like tarot card reading.
To check these, you can:
- Go to ‘where ads showed’ in your account, through Content > Where ads showed.
- Go to Reports > Predefined reports > Other > Performance Max placements.
The MCC Google Ads script will pull these automatically for all accounts in your MCC. But first, content suitability has options to manage placements at a broader level. These should be considered before excluding individual placements.
If you need help with something similar to this blog post, then get in touch through my contact page.
Get in touchContent suitability
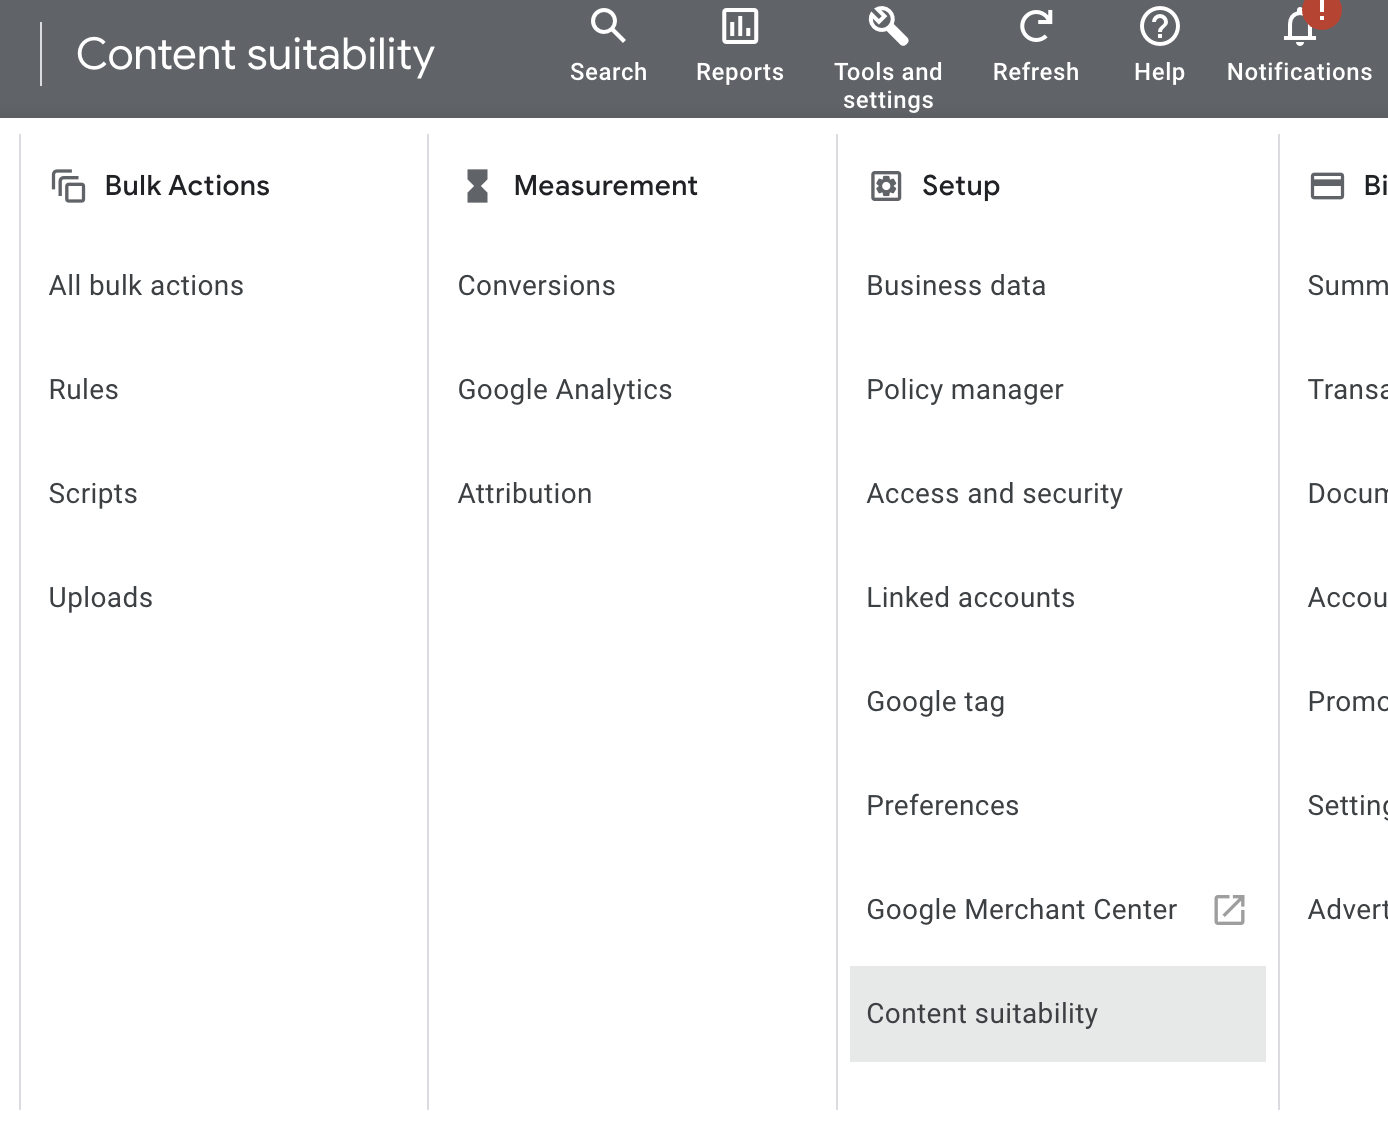
Content suitability can be accessed in Tools and settings > Setup > Content suitability. These settings impact where ads show across all Google networks.
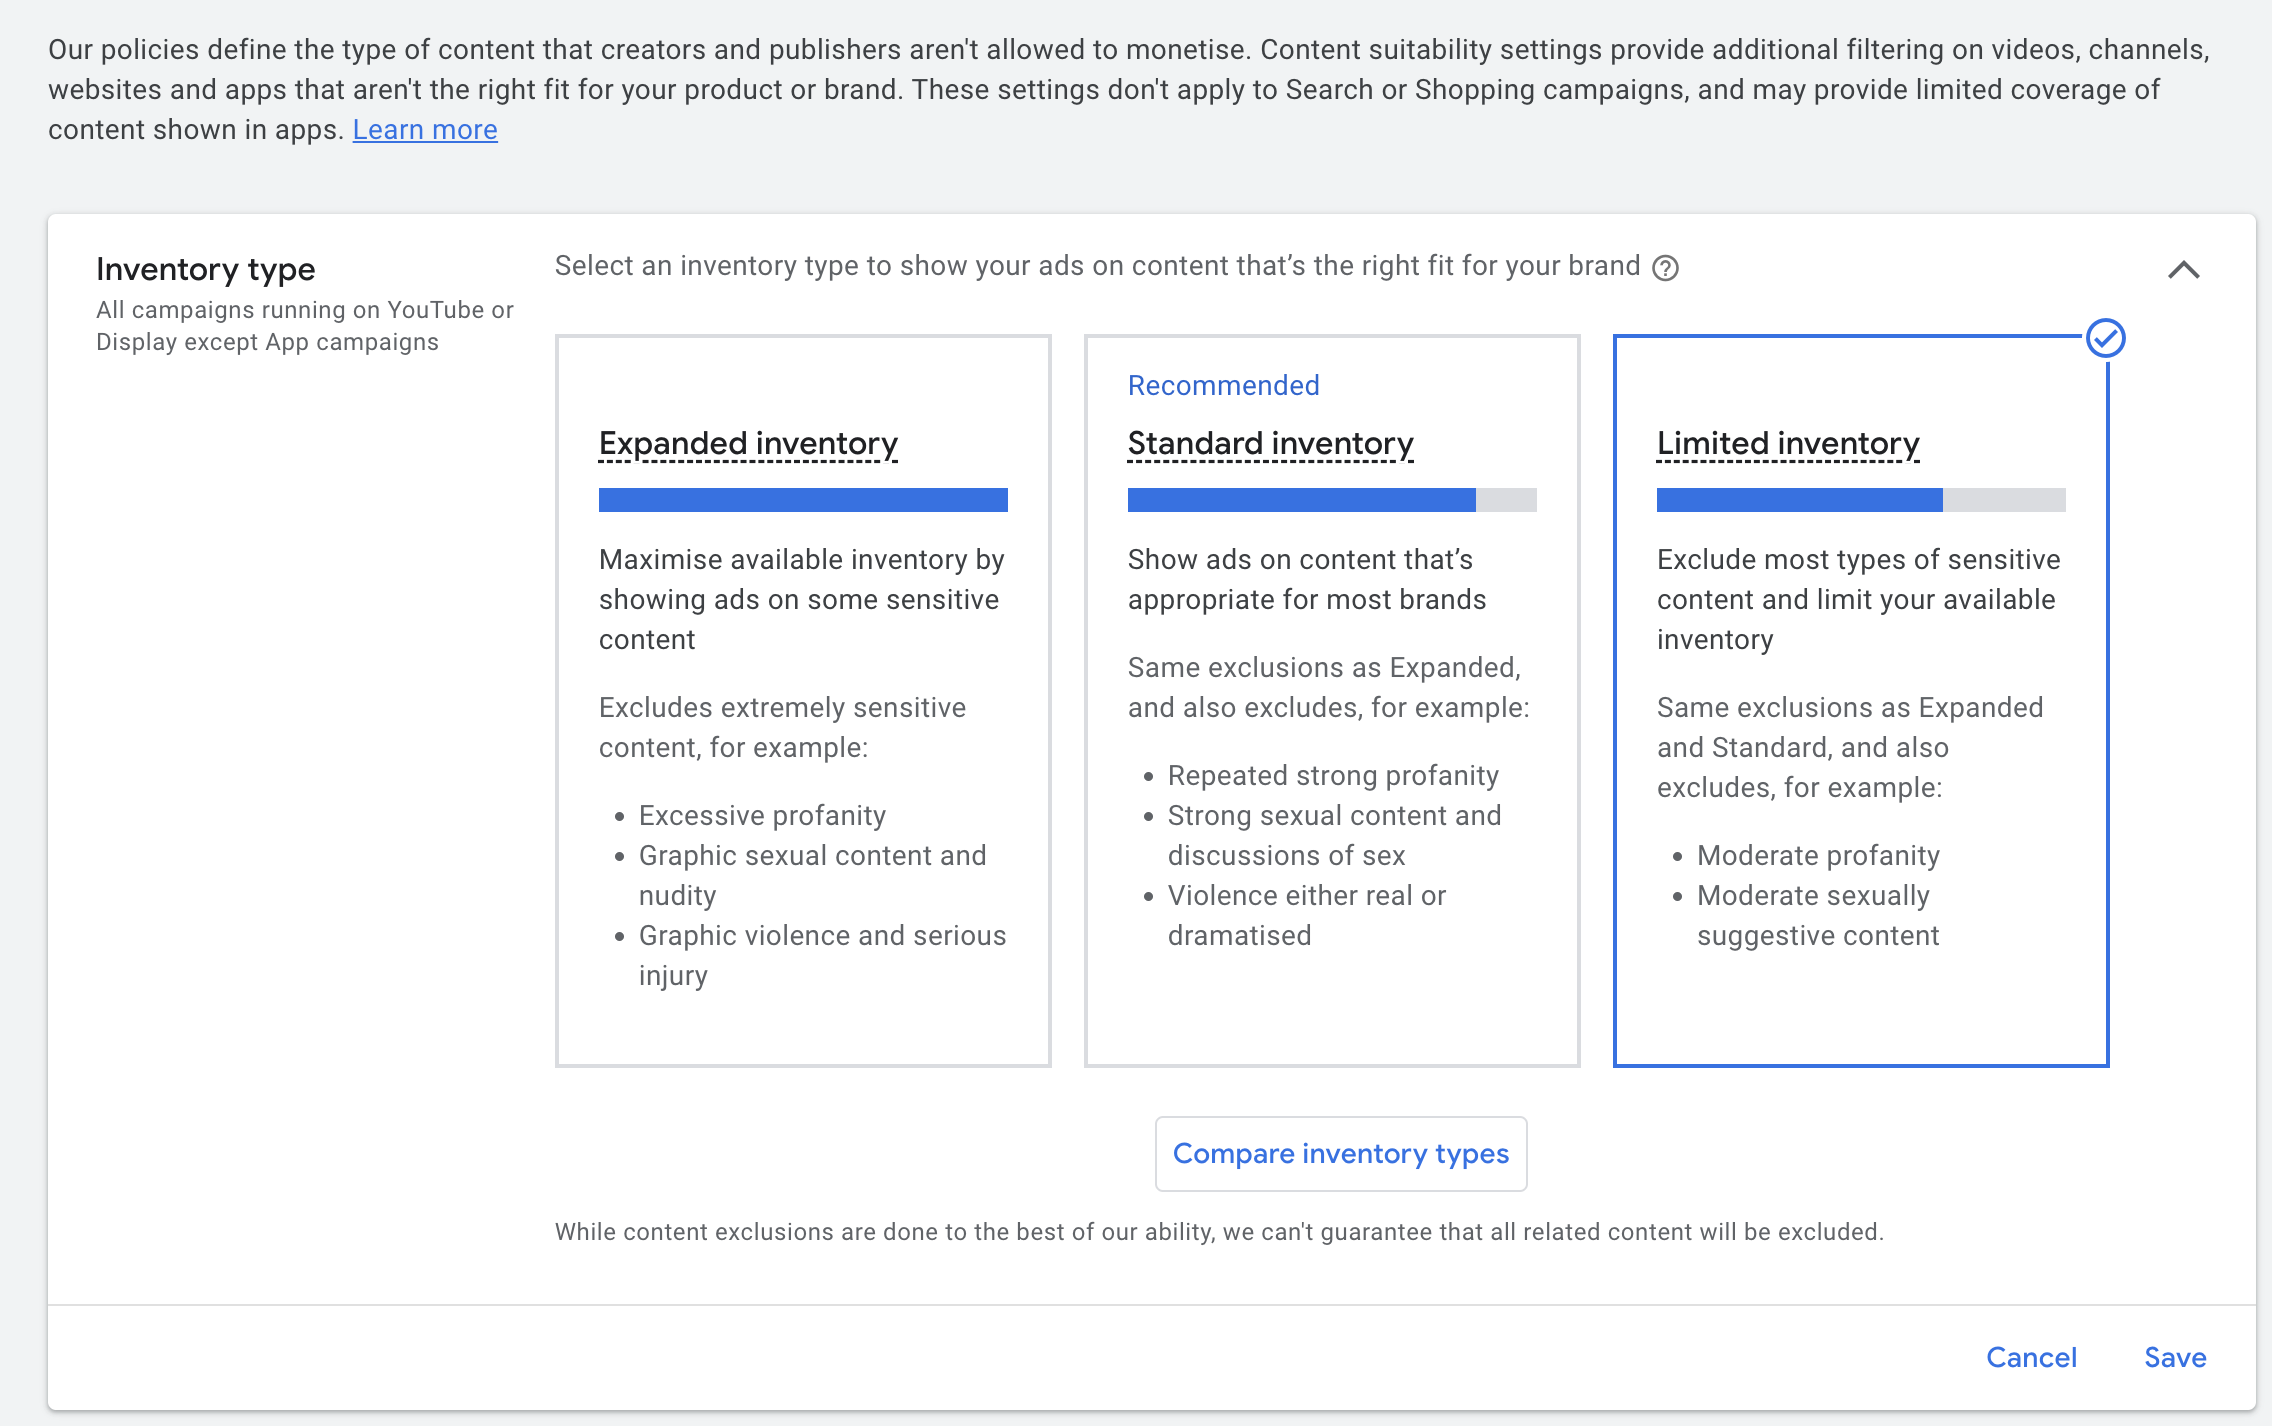
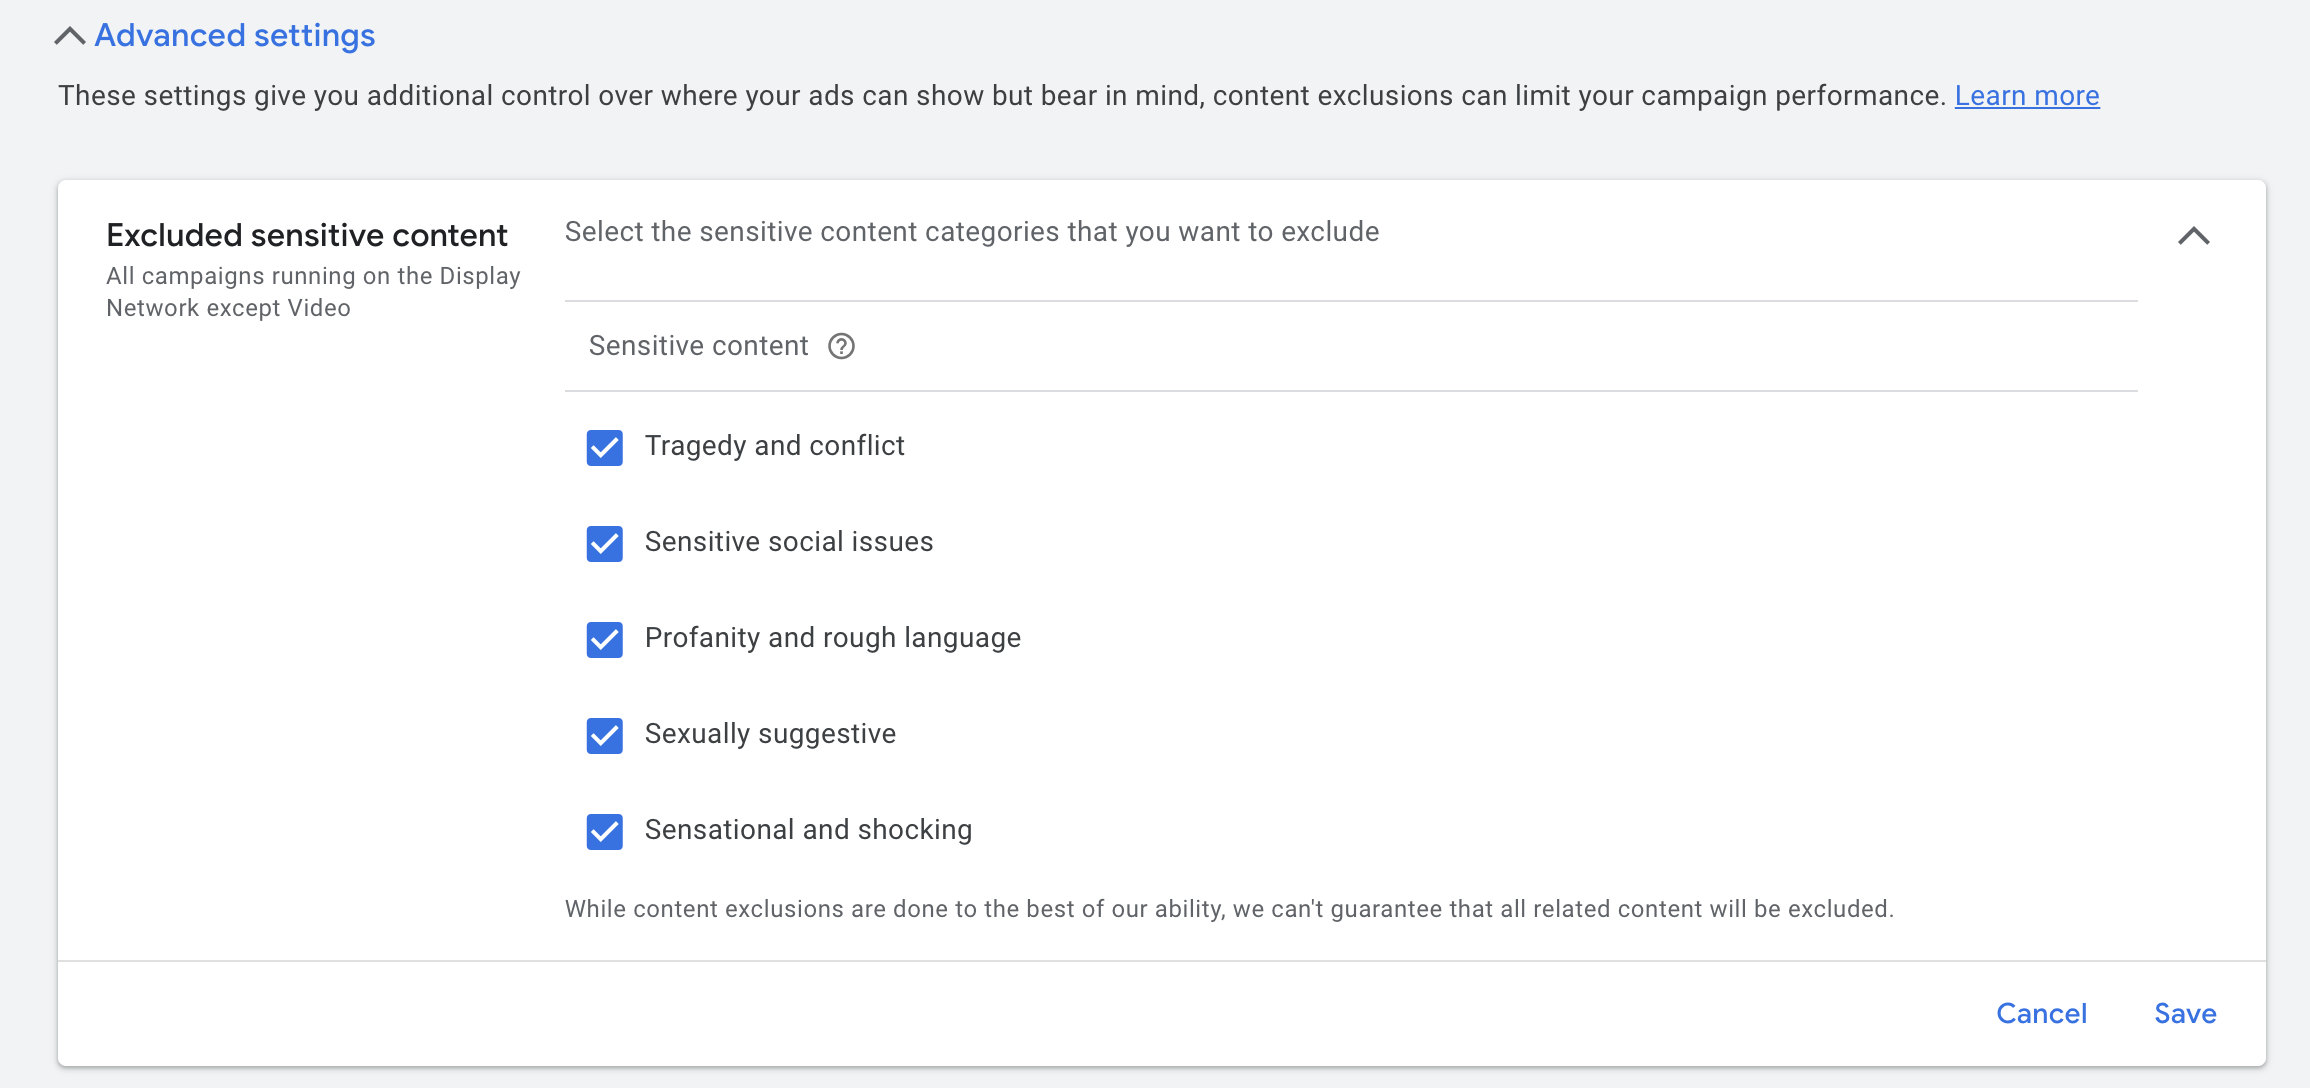
‘Limited inventory’ will provide the most conservative pool of potential placements. All the sensitive topic exclusions are recommended too.
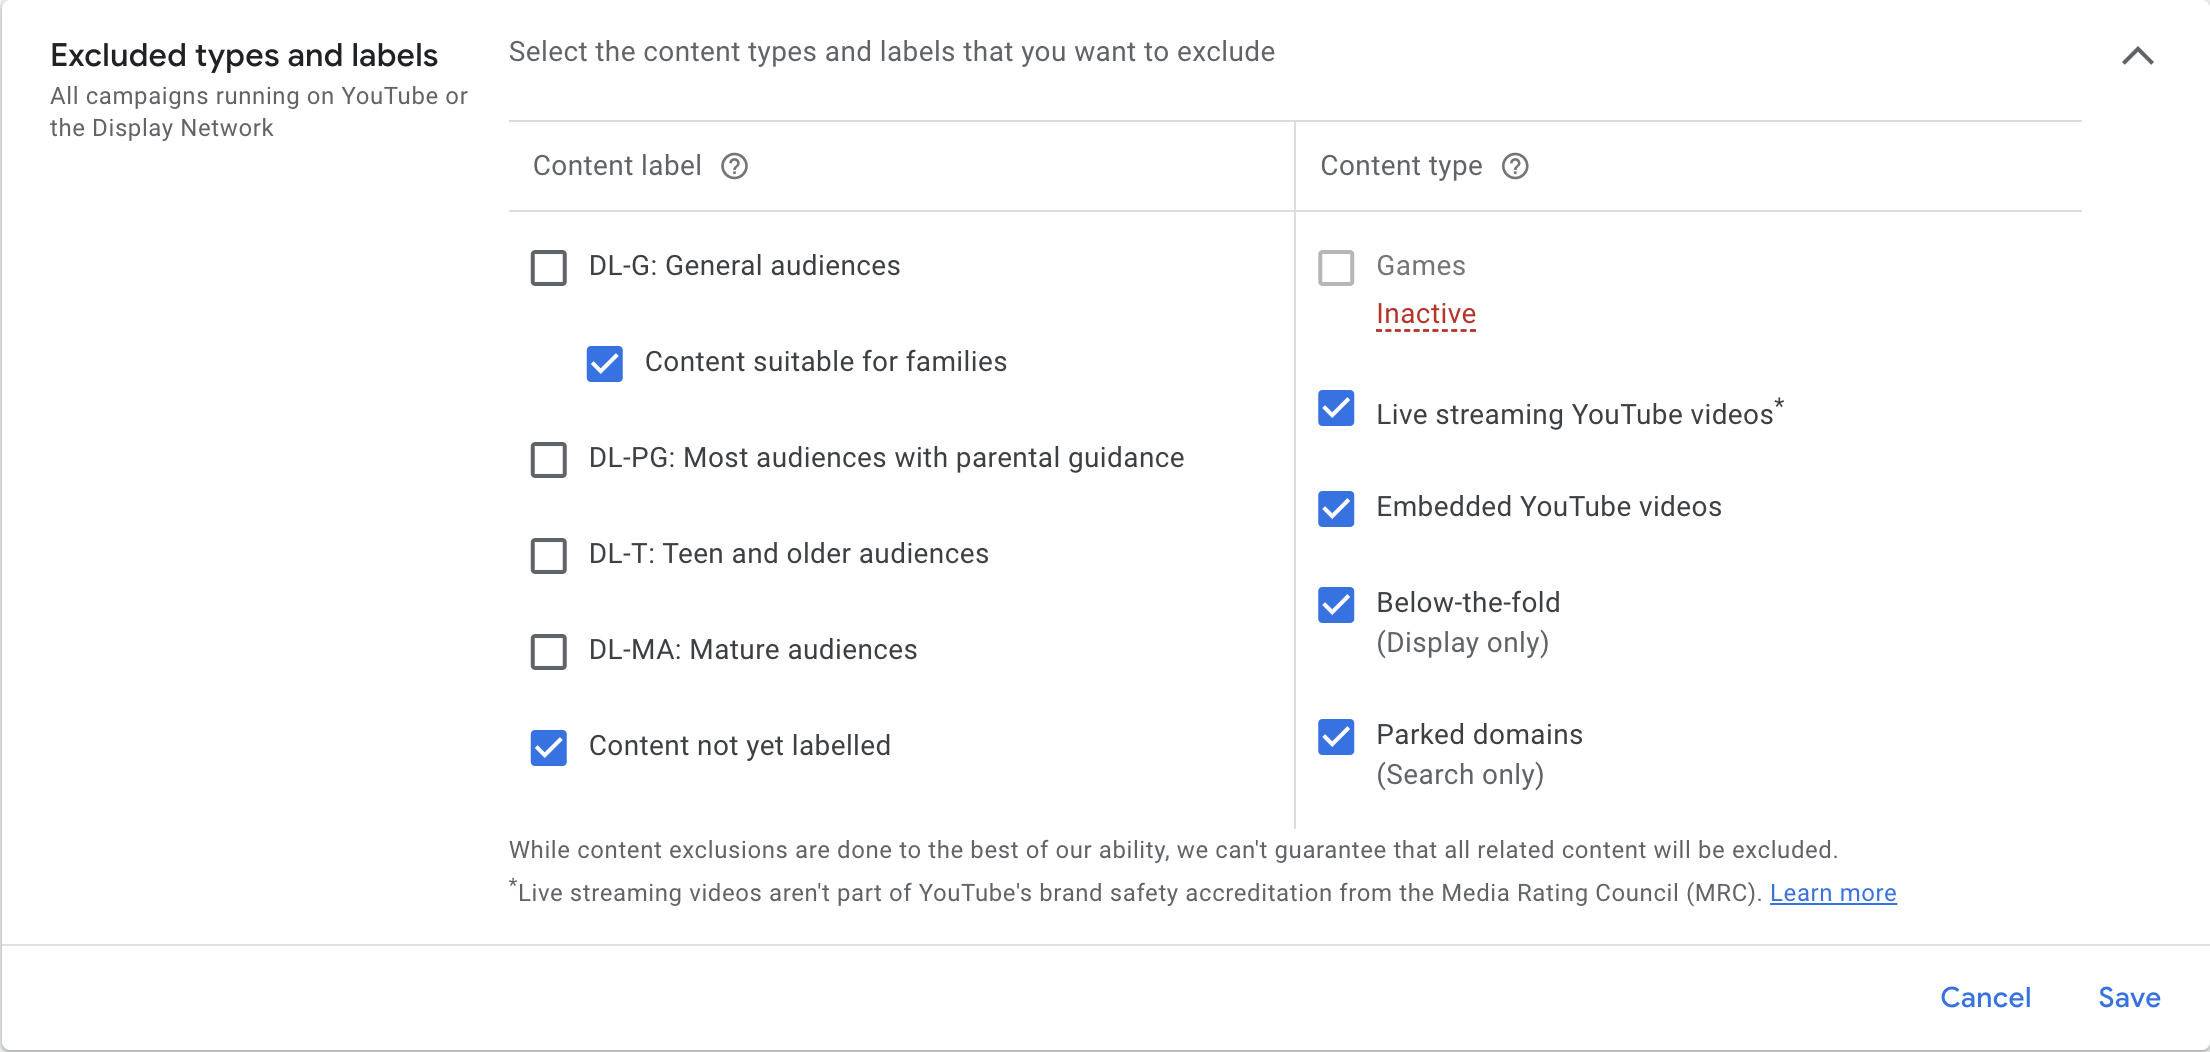
In advanced settings, ‘Excluded types and labels’, ‘content suitable for families’ can exclude content aimed at children. You do not want ads showing on Peppa Pig videos. It is also recommeded to exclude ‘content not yet labelled’.
In the ‘Excluded placements’ section, you can exclude all types of mobile games on both Apple and Google Play. You do not want any accidental clicks from Flappy Bird.
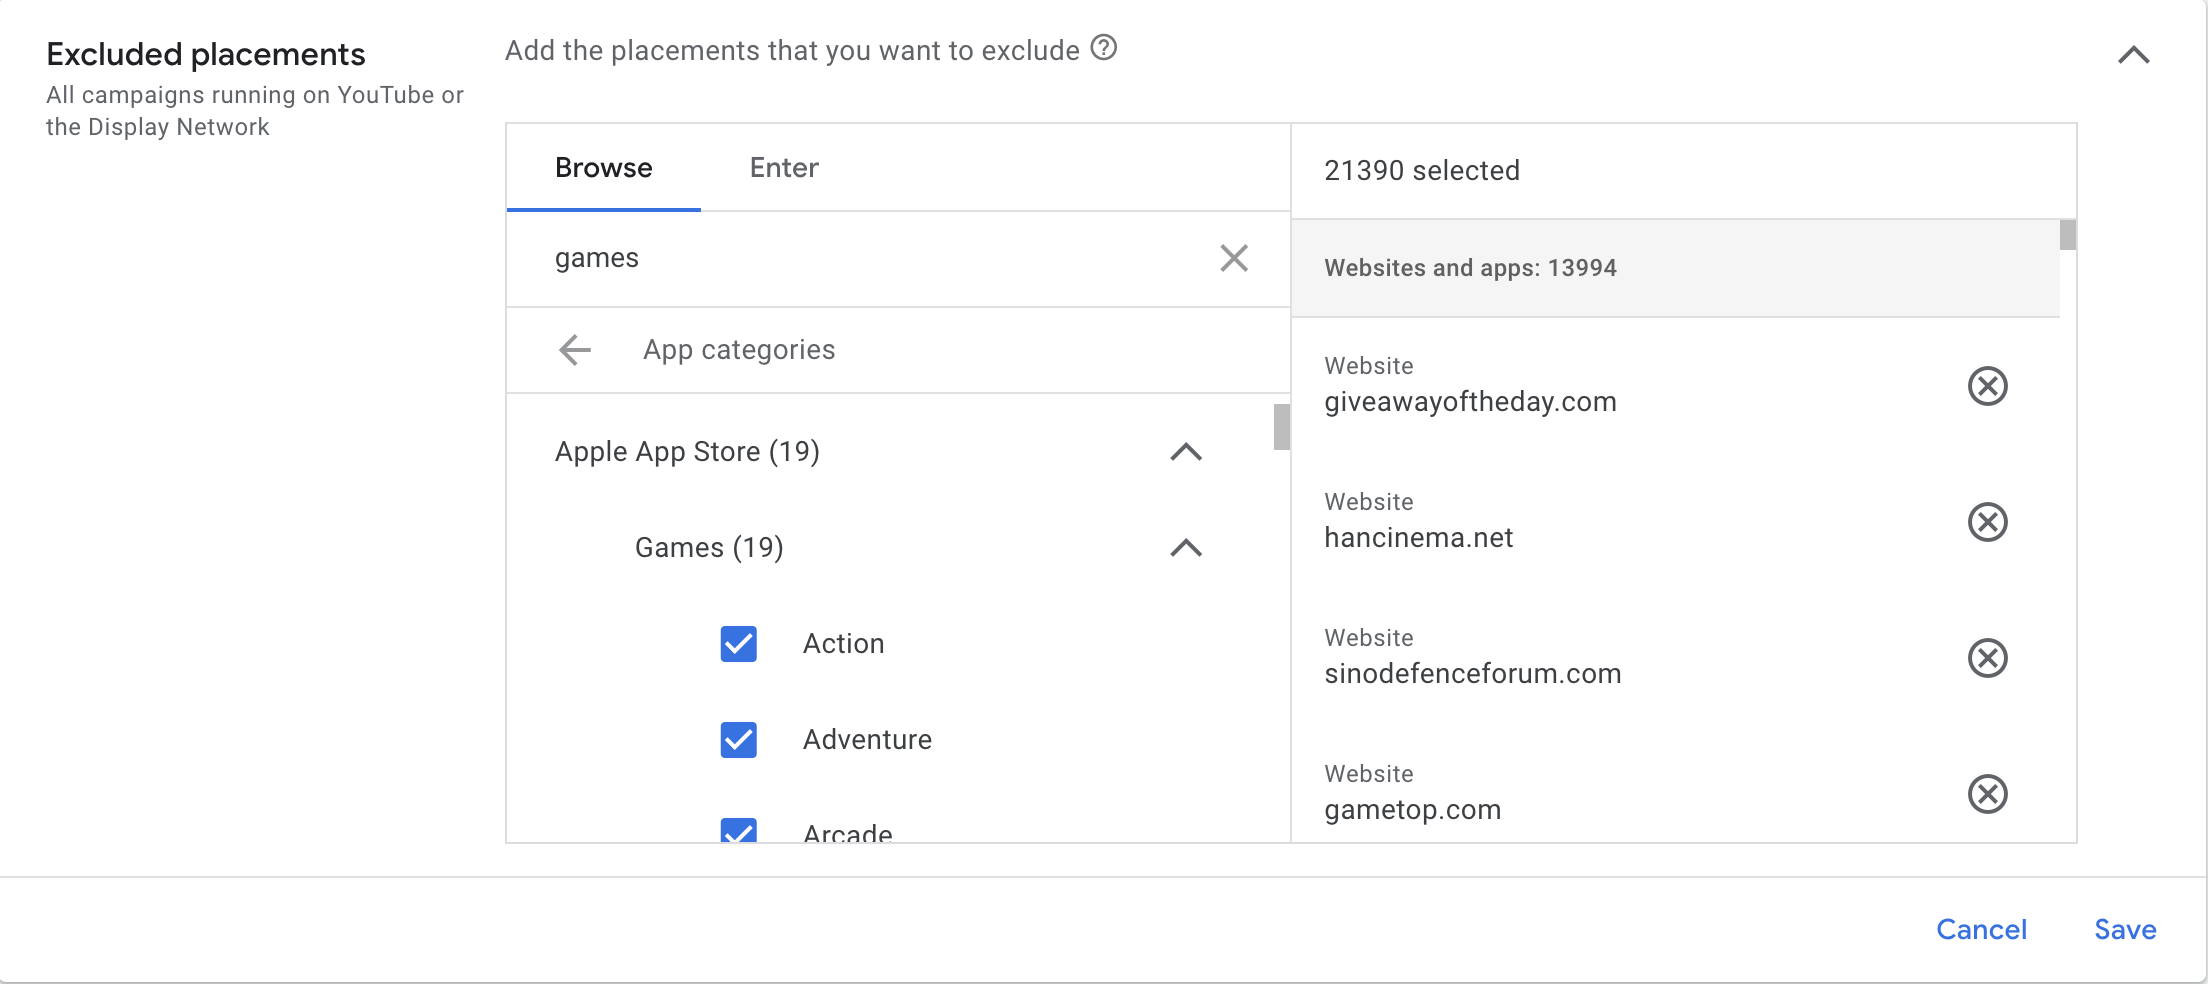
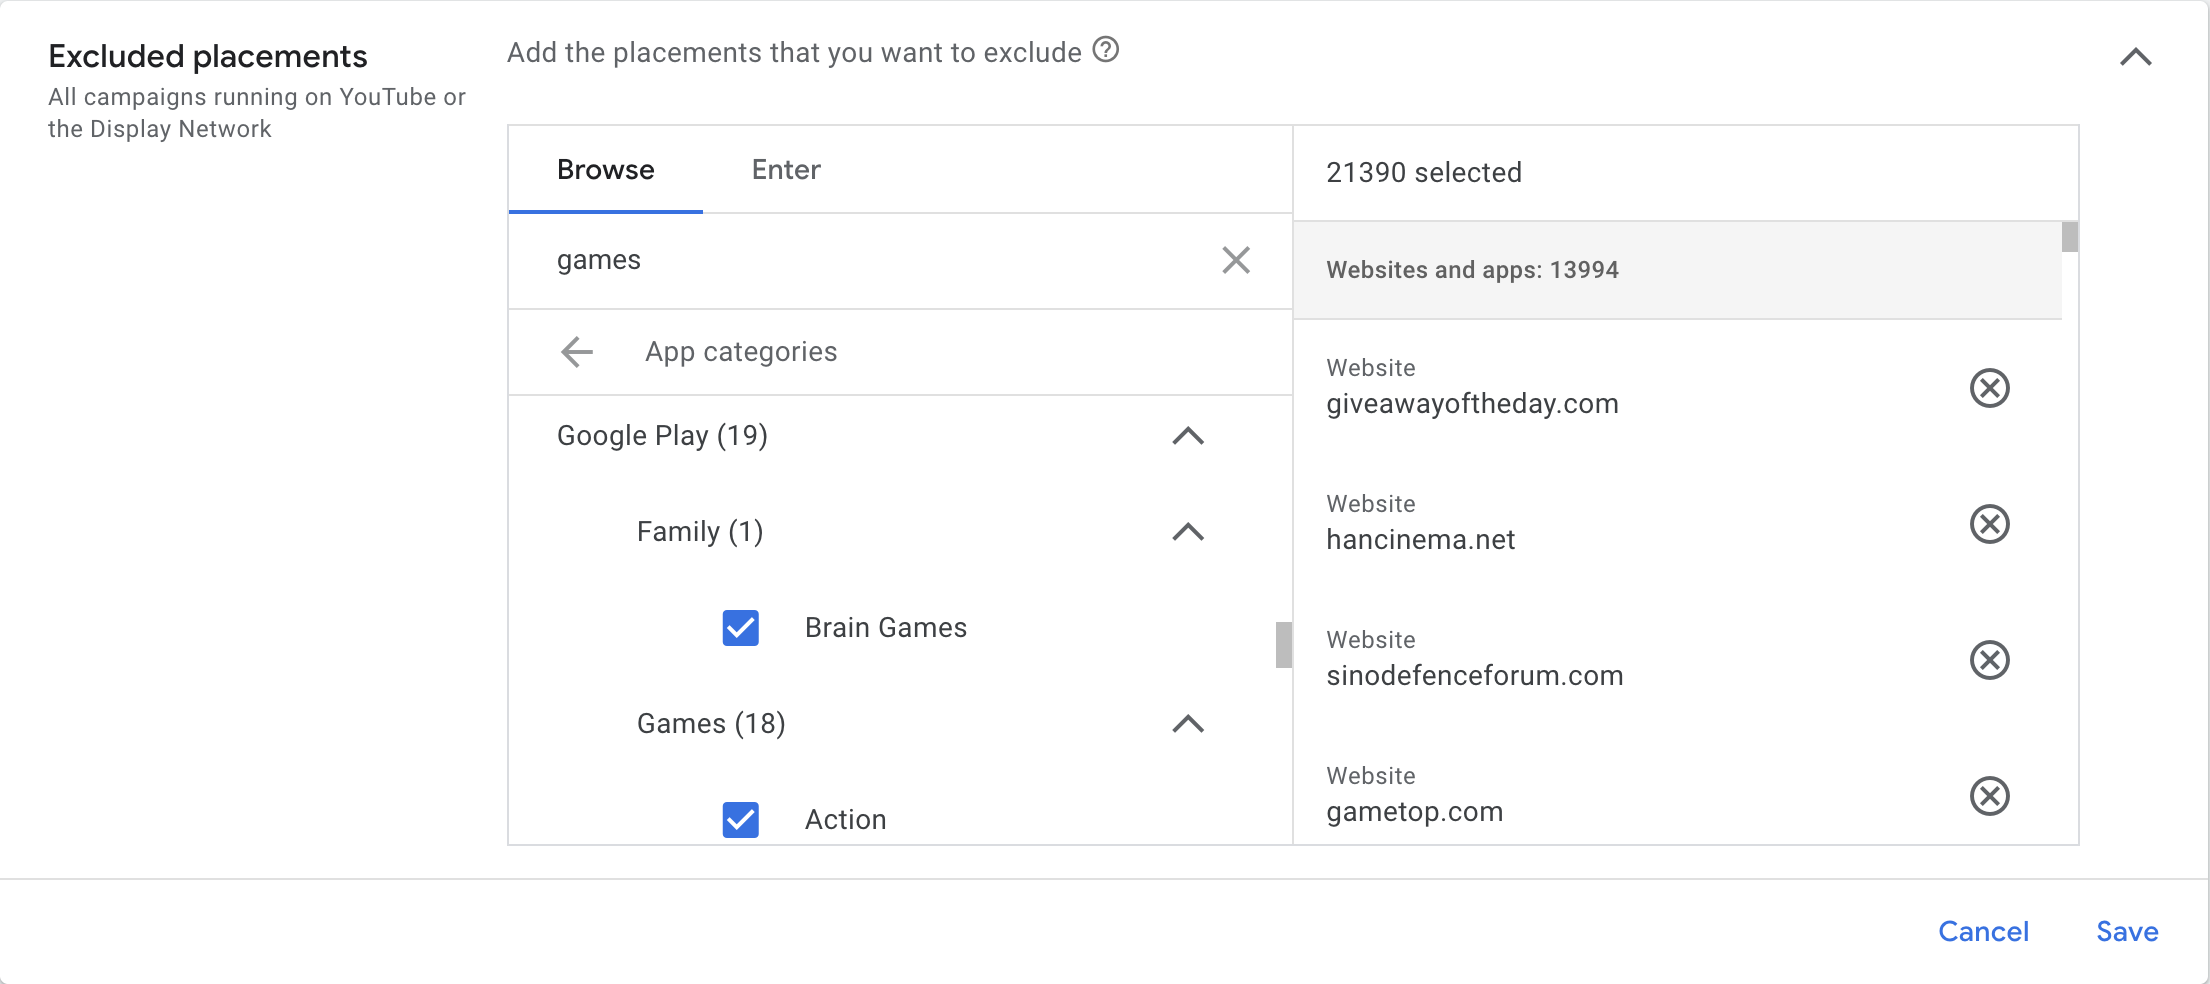
It is recommended to go through these categories and add more exclusions. For example, excluding ‘Music’ stop ads showing on music videos.
Lastly, in excluded content keywords, add a list of keywords to exclude. For example:
baby
baby shark
babyshark
bible
blessing
blessings
call tracker
christ
cleaner
daddy pig
dictionary
downloader
emoji
english tutorials
esol
faith
generator
god
goddess
horoscope
icons
ielts
jesus
keyboard
kids
kids songs
language learning
learn english
manifestation
mp3 converter
pastor
pdf
pdf converter
pedometer
peppa
peppa pig
peppapig
prayer
psychic
rainbow
religion
remote control
scanner
spiritual
step counter
tarot
tot
tots
tv remote
universal remote
video converter
vpn
wifi
worship
You will see why these keywords were chosen when you run the MCC script.
The MCC Google Ads script
This script will pull the top 500 placements for each account in the MCC, ordered by clicks, conversions and impressions. Then, it will add them to a Google Sheet.
To use it, at the MCC level, go to Tools and settings > Bulk actions > Scripts.
Then, push the plus (+) button to create a new script. Here are some instructions on how to add a new Script to the MCC if you need more guidance.
Then, paste in the following script, modifying the configuration variables based on:
- The start date in yyyy-mm-dd format.
- The end date in yyyy-mm-dd format if to override the default of today.
- The ID of the Google Sheet to add the data to. This is in the URL of the Google Sheet. For example, if the URL is:
Then the ID is:
https://docs.google.com/spreadsheets/d/12K2f5pi77egKbLd8M7Vj63ifIJJ9fl9PMxFpoLGl2zY/edit#gid%253D656415906Make a copy of my template and update the config ID with your new spreadsheet ID.1Bx_l29l-LsySbmdVz4YH5X7kIjwQ6n8fPb40TGAIUD4 - The name of the Google Sheet tab to add the data to.
// CONFIG - EDIT THESE //

const startDate = "2023-01-01";
const endDateOverride = null;
const spreadsheetId = "1Bx_l29l-LsySbmdVz4YH5X7kIjwQ6n8fPb40TGAIUD4";
const tabName = "Display Placements [DATA]";

// DO NOT TOUCH THE REST UNLESS YOU KNOW WHAT YOU ARE DOING //

function main() {
  const accountSelector = MccApp.accounts();

  accountSelector.executeInParallel(
    "processClientAccount",
    "afterProcessAllClientAccounts",
  );
}

function processClientAccount() {
  const account = AdsApp.currentAccount();

  const today = new Date();

  const formatDateAsString = (date) => {
    return Utilities.formatDate(date, account.getTimeZone(), "yyyy-MM-dd");
  };

  const accountName = account.getName();

  const endDate = endDateOverride ? endDateOverride : formatDateAsString(today);

  const query =
    `SELECT group_placement_view.display_name, group_placement_view.target_url, metrics.clicks, metrics.active_view_impressions, metrics.conversions,
    metrics.cost_micros ` +
    `FROM group_placement_view WHERE segments.date BETWEEN '${startDate}' AND '${endDate}' ` +
    `ORDER BY metrics.clicks DESC, metrics.conversions DESC, metrics.active_view_impressions DESC ` +
    `LIMIT 500`;

  const rows = AdsApp.report(query).rows();

  let returnValue = [];

  while (rows.hasNext()) {
    let row = rows.next();

    returnValue.push({
      "AccountDescriptiveName": accountName,
      "DisplayName": row["group_placement_view.display_name"],
      "PlacementTargetUrl": row["group_placement_view.target_url"],
      "Impressions": row["metrics.active_view_impressions"],
      "Clicks": row["metrics.clicks"],
      "Conversions": row["metrics.conversions"],
      "Cost": row["metrics.cost_micros"]
    });
  }

  return returnValue;
}

function addDataToSheet(sheet, data, autoFillFormulae) {
  //clears any extra at bottom, rather than just doing the number of rows in the data
  const rangeToClear = sheet.getRange(1, 1, sheet.getLastRow(), data[0].length);
  try {
    rangeToClear.clear();
  } catch (e) {
    Logger.log("No data to clear.");
  }
  //Pastes the csv file in the sheet
  sheet.getRange(1, 1, data.length, data[0].length).setValues(data);

  if (autoFillFormulae) {
    //find ranges that need autofilling

    const lastColumn = sheet.getLastColumn();

    for (let i = data[0].length + 1; i < lastColumn + 1; i++) {
      let source = sheet.getRange(2, i);

      let destination = sheet.getRange(2, i, data.length);

      source.autoFill(
        destination,
        SpreadsheetApp.AutoFillSeries.DEFAULT_SERIES,
      );
    }
  }
}

function afterProcessAllClientAccounts(results) {
  let finalData = [[
    "AccountDescriptiveName",
    "DisplayName",
    "PlacementTargetUrl",
    "Impressions",
    "Clicks",
    "Conversions",
    "Cost"
  ]];
  for (let i = 0; i < results.length; i++) {
    let result = JSON.parse(results[i].getReturnValue());

    for (let j = 0; j < result.length; j++) {
      let row = result[j];

      finalData.push([
        row["AccountDescriptiveName"],
        row["DisplayName"],
        row["PlacementTargetUrl"],
        row["Impressions"],
        row["Clicks"],
        row["Conversions"],
        row["Cost"]/1000000
      ]);
    }
  }

  const ss = SpreadsheetApp.openById(spreadsheetId);
  const sheet = ss.getSheetByName(tabName);

  addDataToSheet(sheet, finalData, true);
}
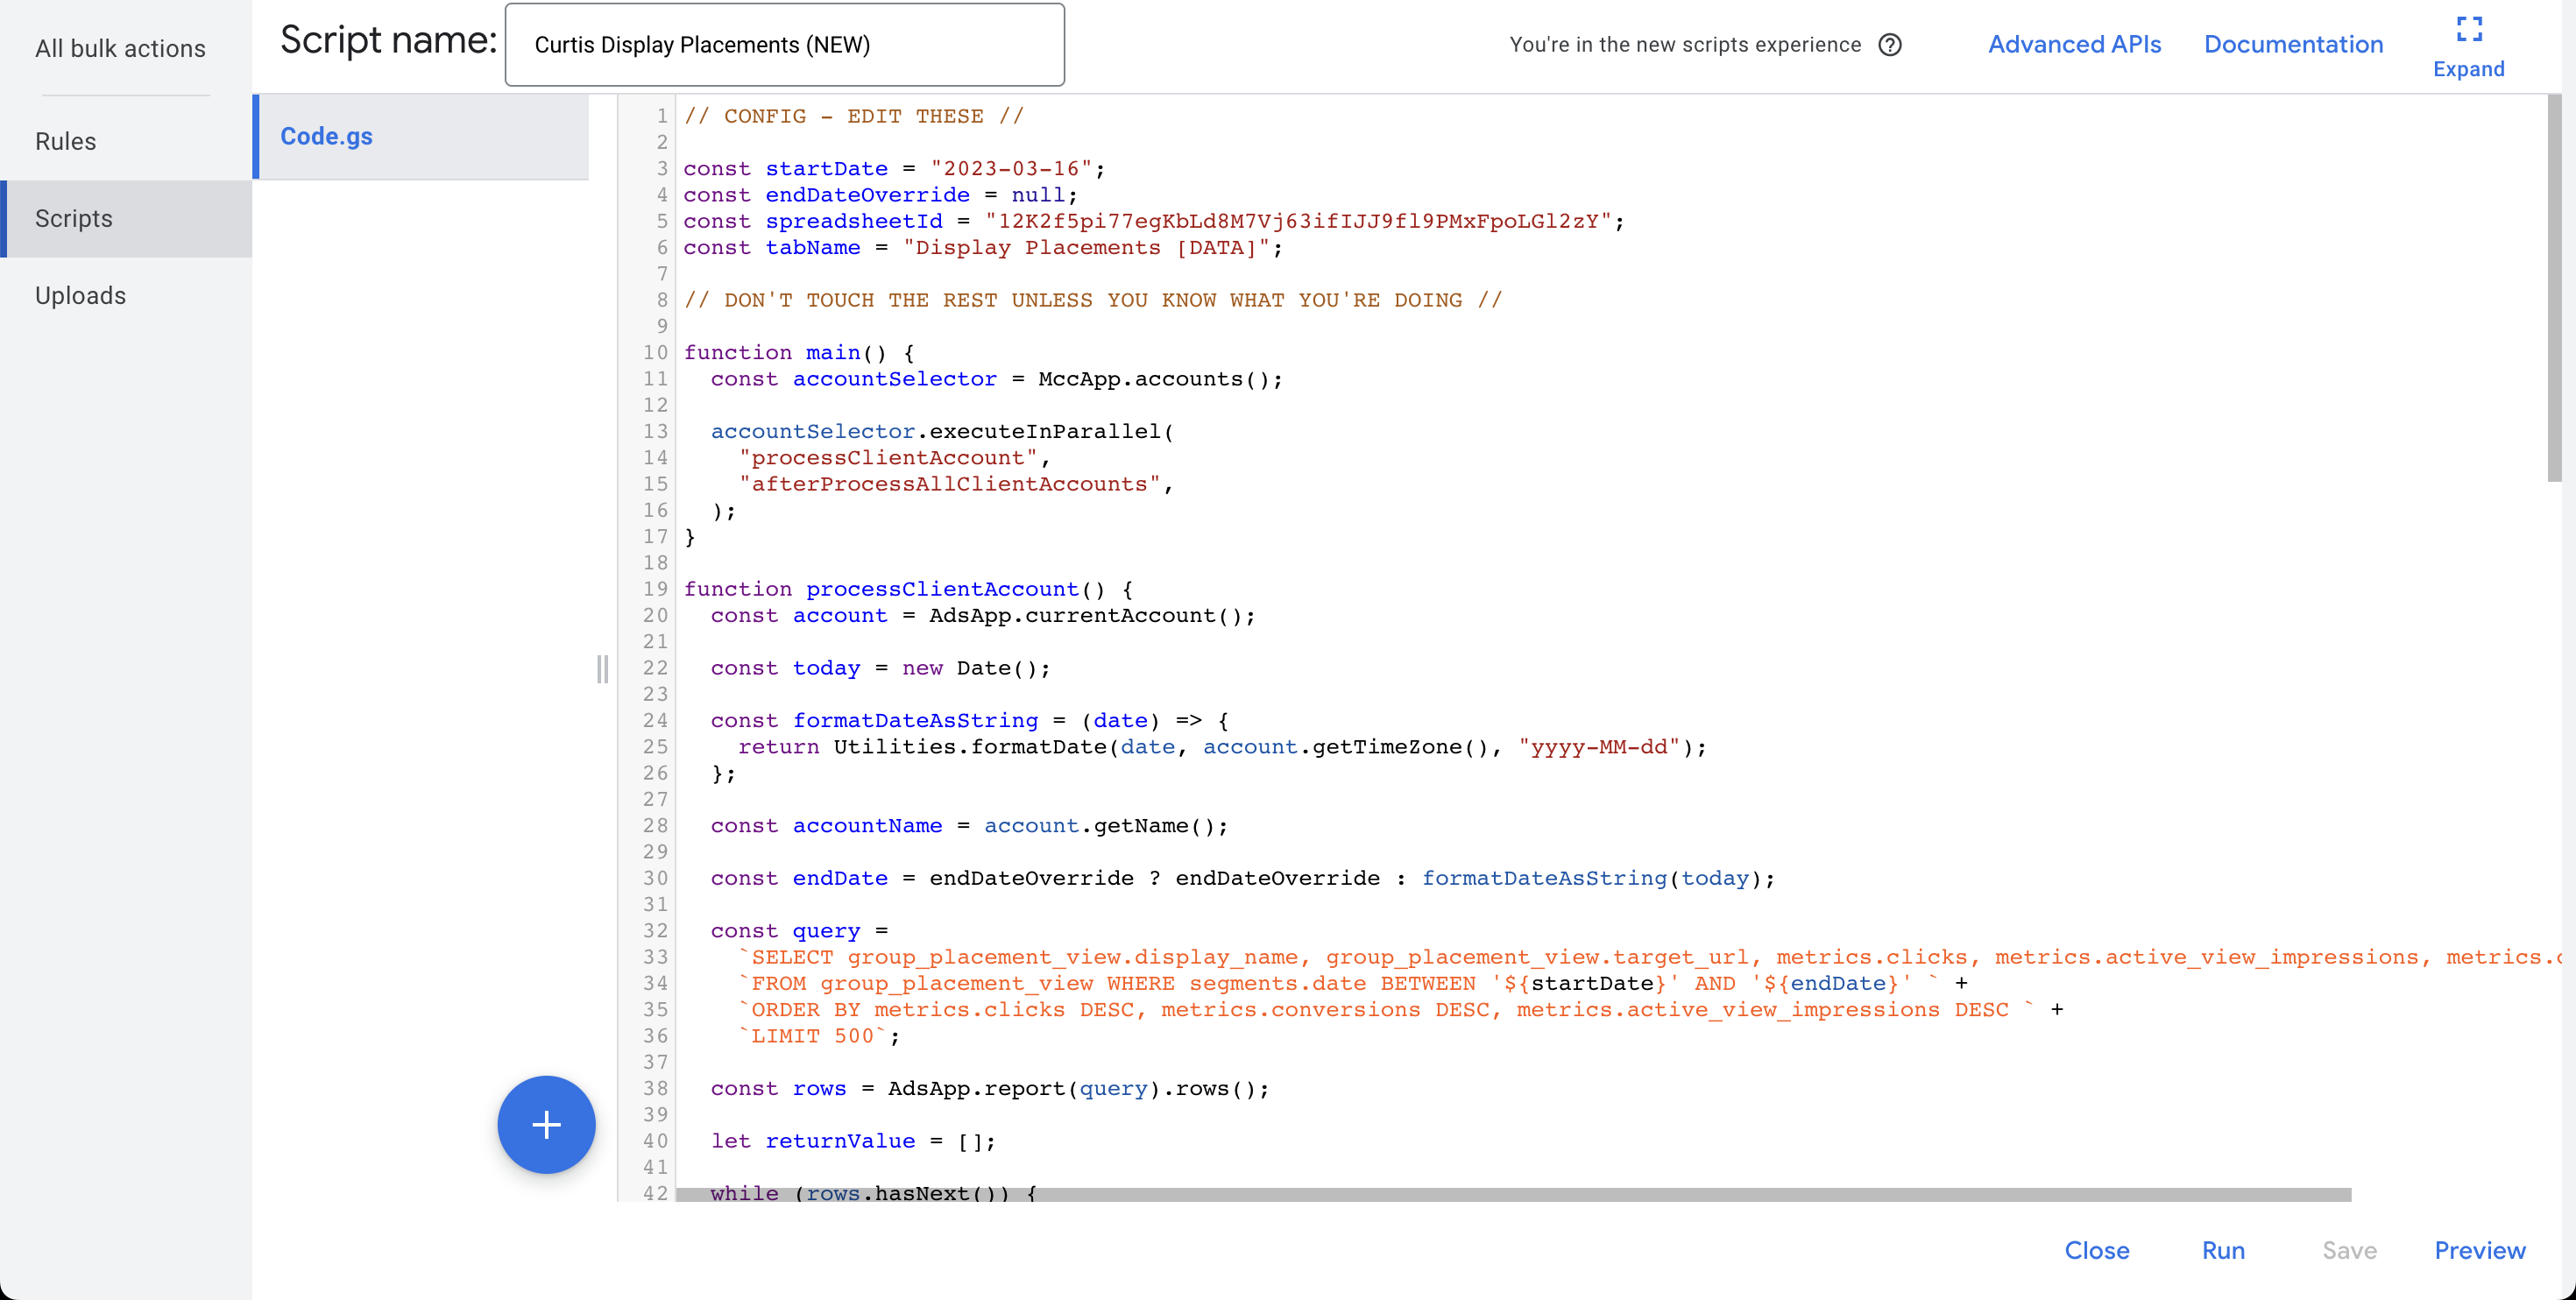
Click the ‘Save’ button, and run the script to check it is working. Once confirmed, schedule the script to run daily.
The Google Sheet
If you have not already, make a copy of this spreadsheet. Update your script config with your new ID, and get going straight away. If you want to set it up yourself, follow the steps below.
Add two additional tabs to your Sheet. One called ‘Display Placement Whitelist [DATA]’ and one called ‘Display Placement Exclusions [DATA]’.
One for your whitelisted placements, and the other for your blacklist. Both tabs should have the following columns.
| DisplayName | PlacementTargetUrl |
|---|---|
| Example website | example.com |
| Example YouTube Channel | youtube.com/channel/UCk8GzjMOrta8yxDcKfylJYw |
Once added, add two additional columns to our main tab with the data from the script. One, to check whether the placement is already in the whitelist, and two to check the blacklist. It should look something like:
=IFERROR(LEN(XLOOKUP(C2,'Display Placement Whitelist [DATA]'!B:B,'Display Placement Whitelist [DATA]'!B:B))>0,FALSE)
=IFERROR(LEN(XLOOKUP(C2,'Display Placement Exclusions [DATA]'!B:B,'Display Placement Exclusions [DATA]'!B:B))>0,FALSE)
Drag these formulae down, and create a pivot table to show the data. Filter the pivot table by In Whitelist = FALSE and In Blacklist = FALSE. This will only show placements you have not already assessed.
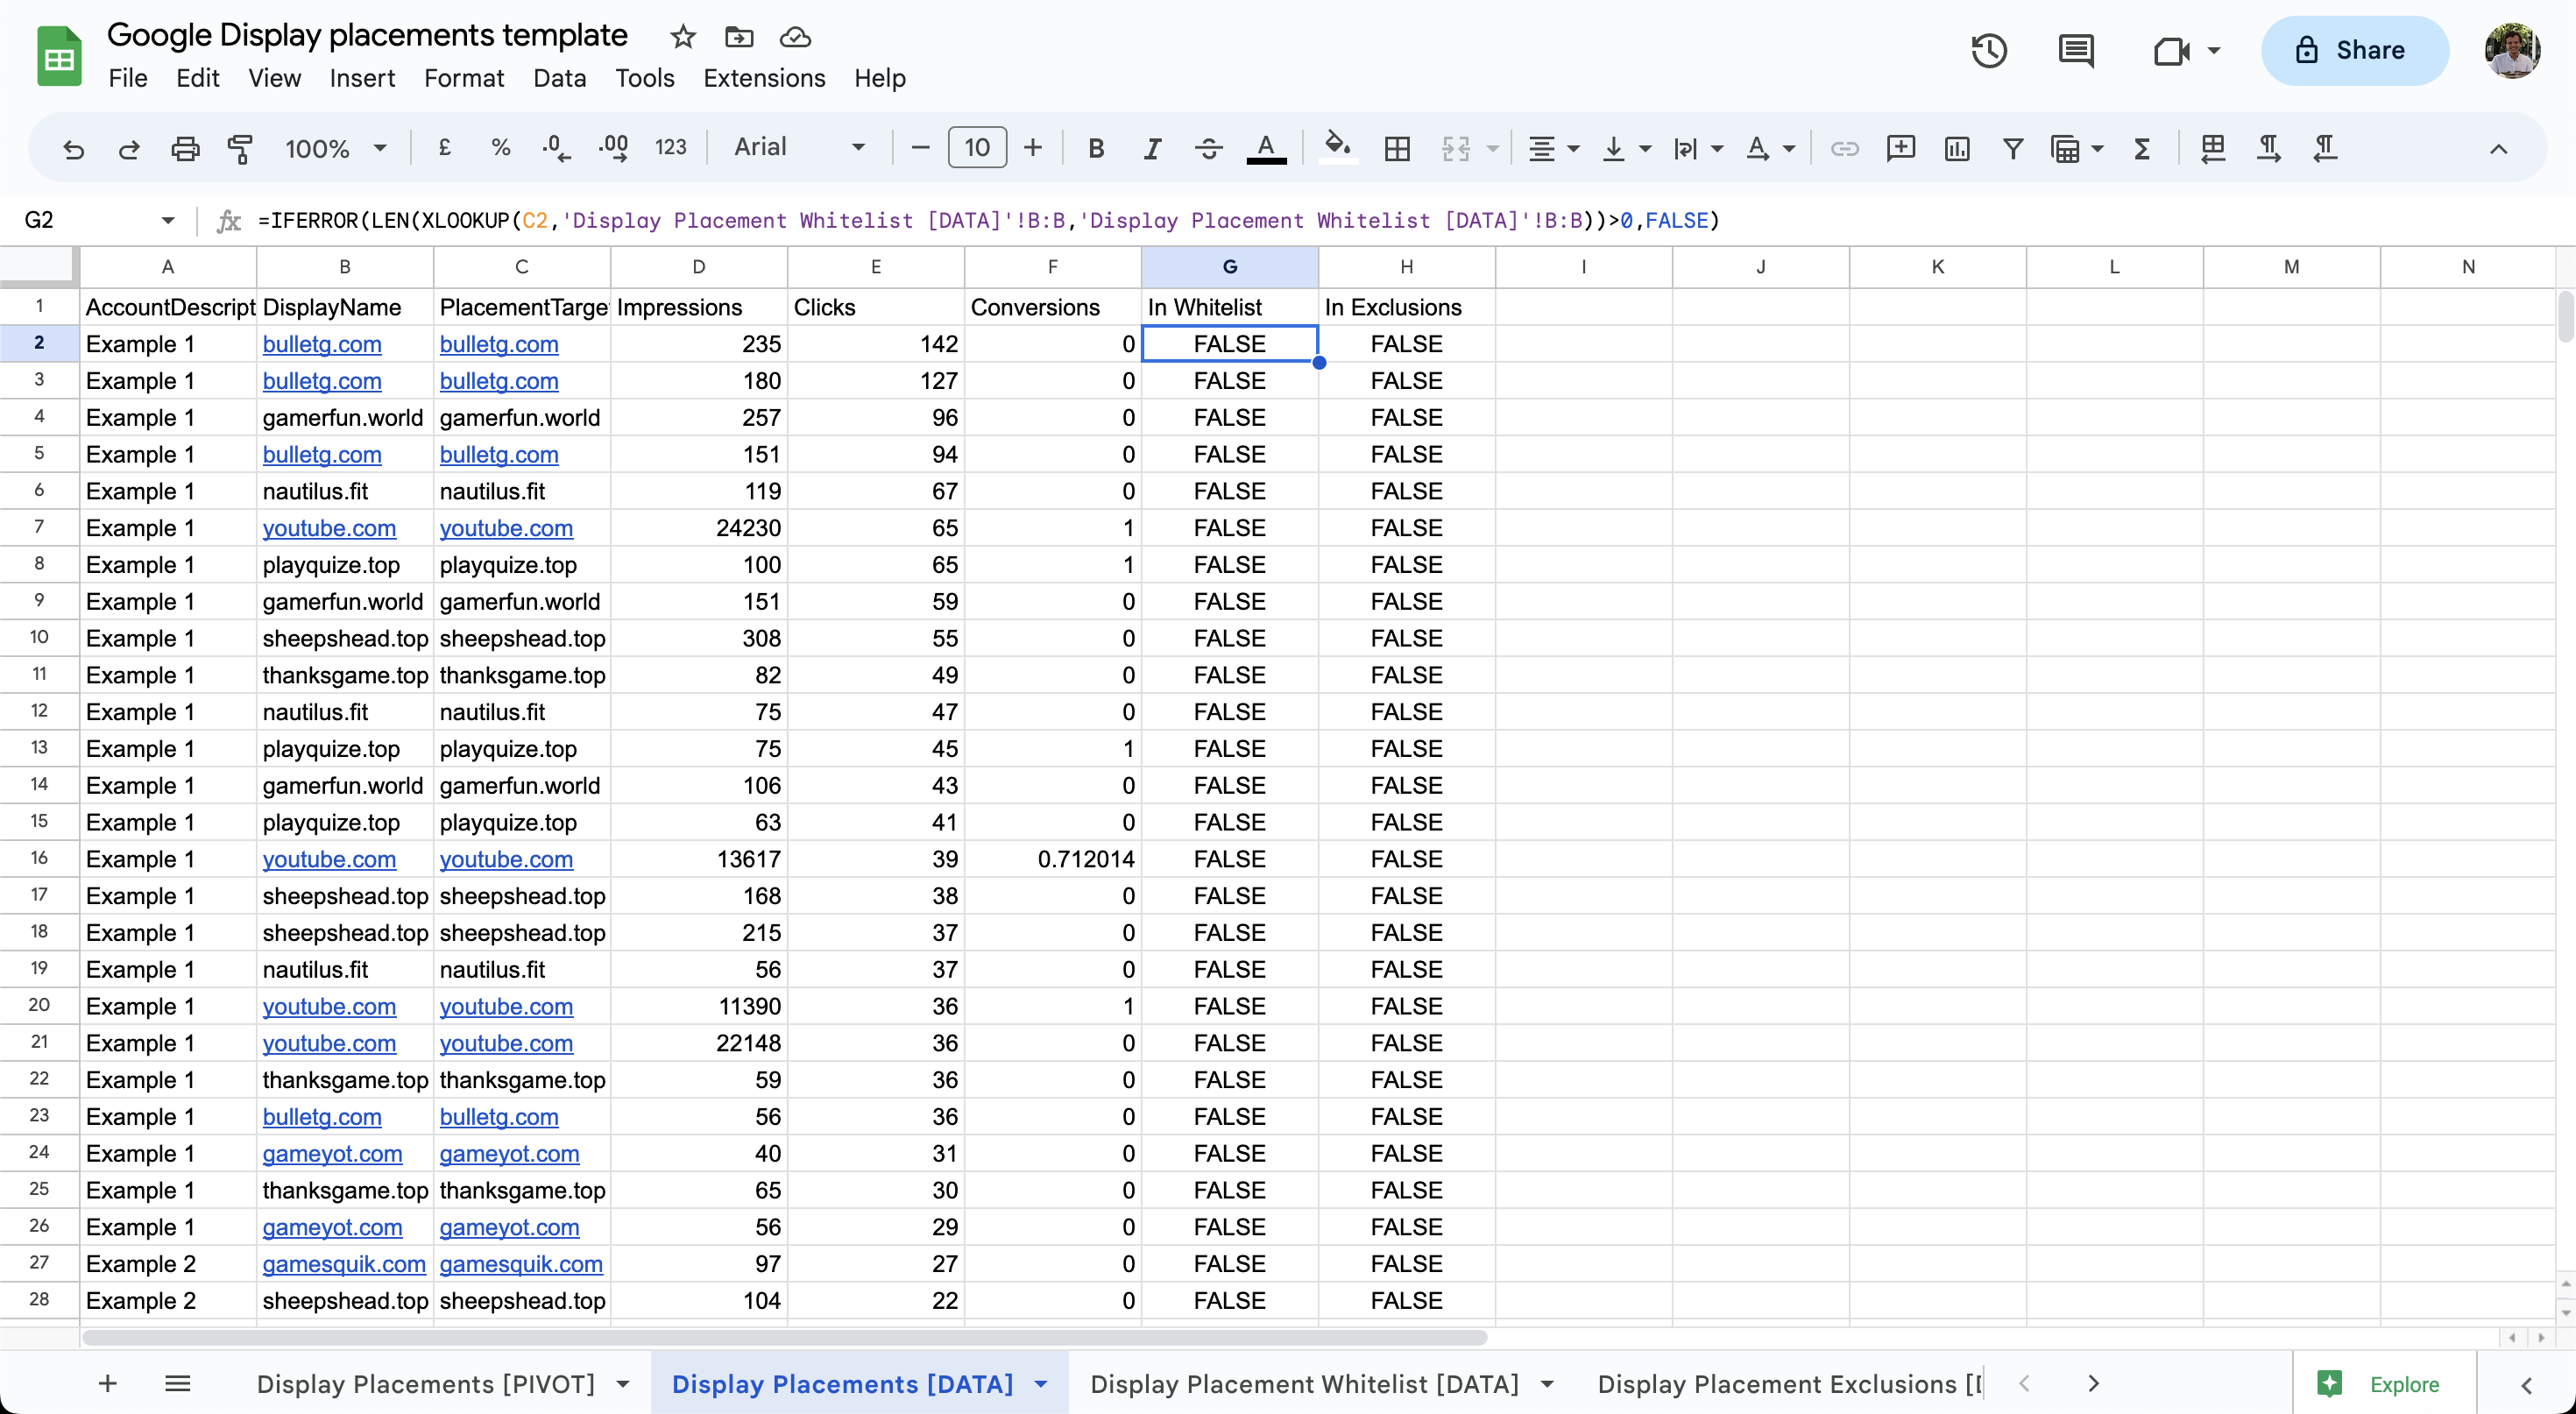
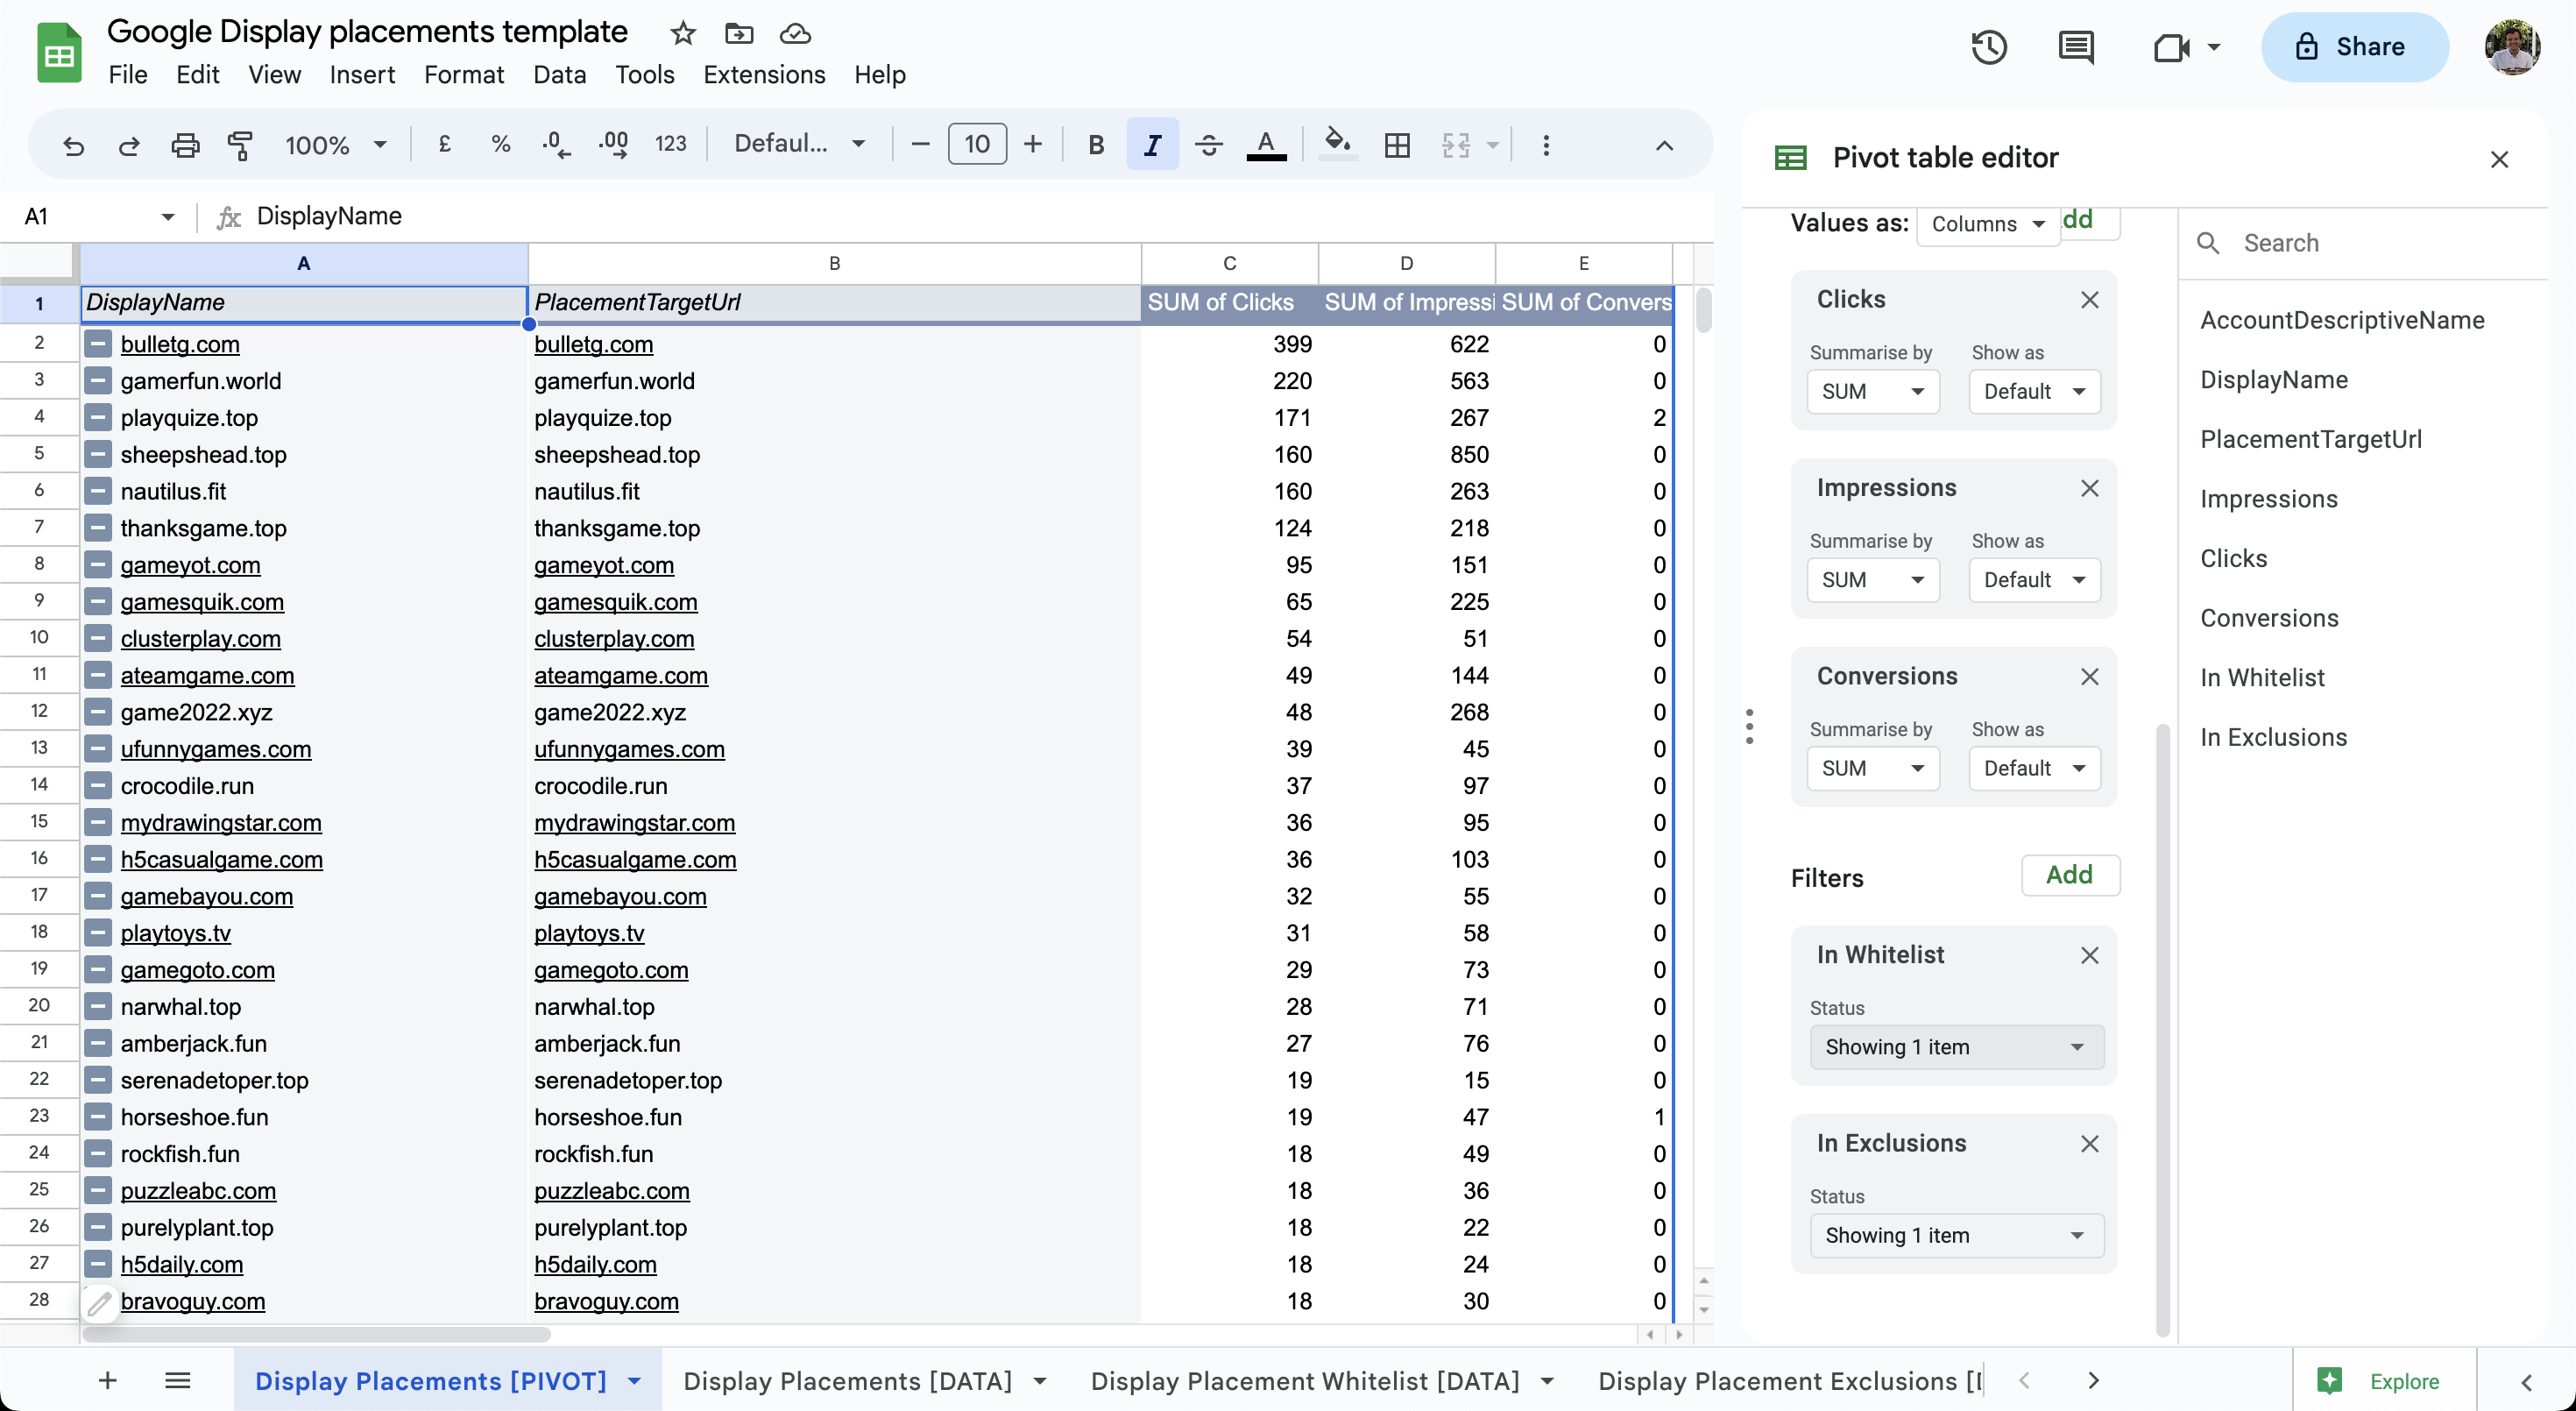
Now, you are ready to go. Sort the pivot table based on clicks and:
- Copy placement URLs you want to exclude into the blacklist tab.
- Copy placement URLs you want to continue serving ads on into the whitelist tab.
- Each time you review the placements, copy all the blacklisted placement URLs. Paste them into the “Excluded placements” section of the Content suitability settings.
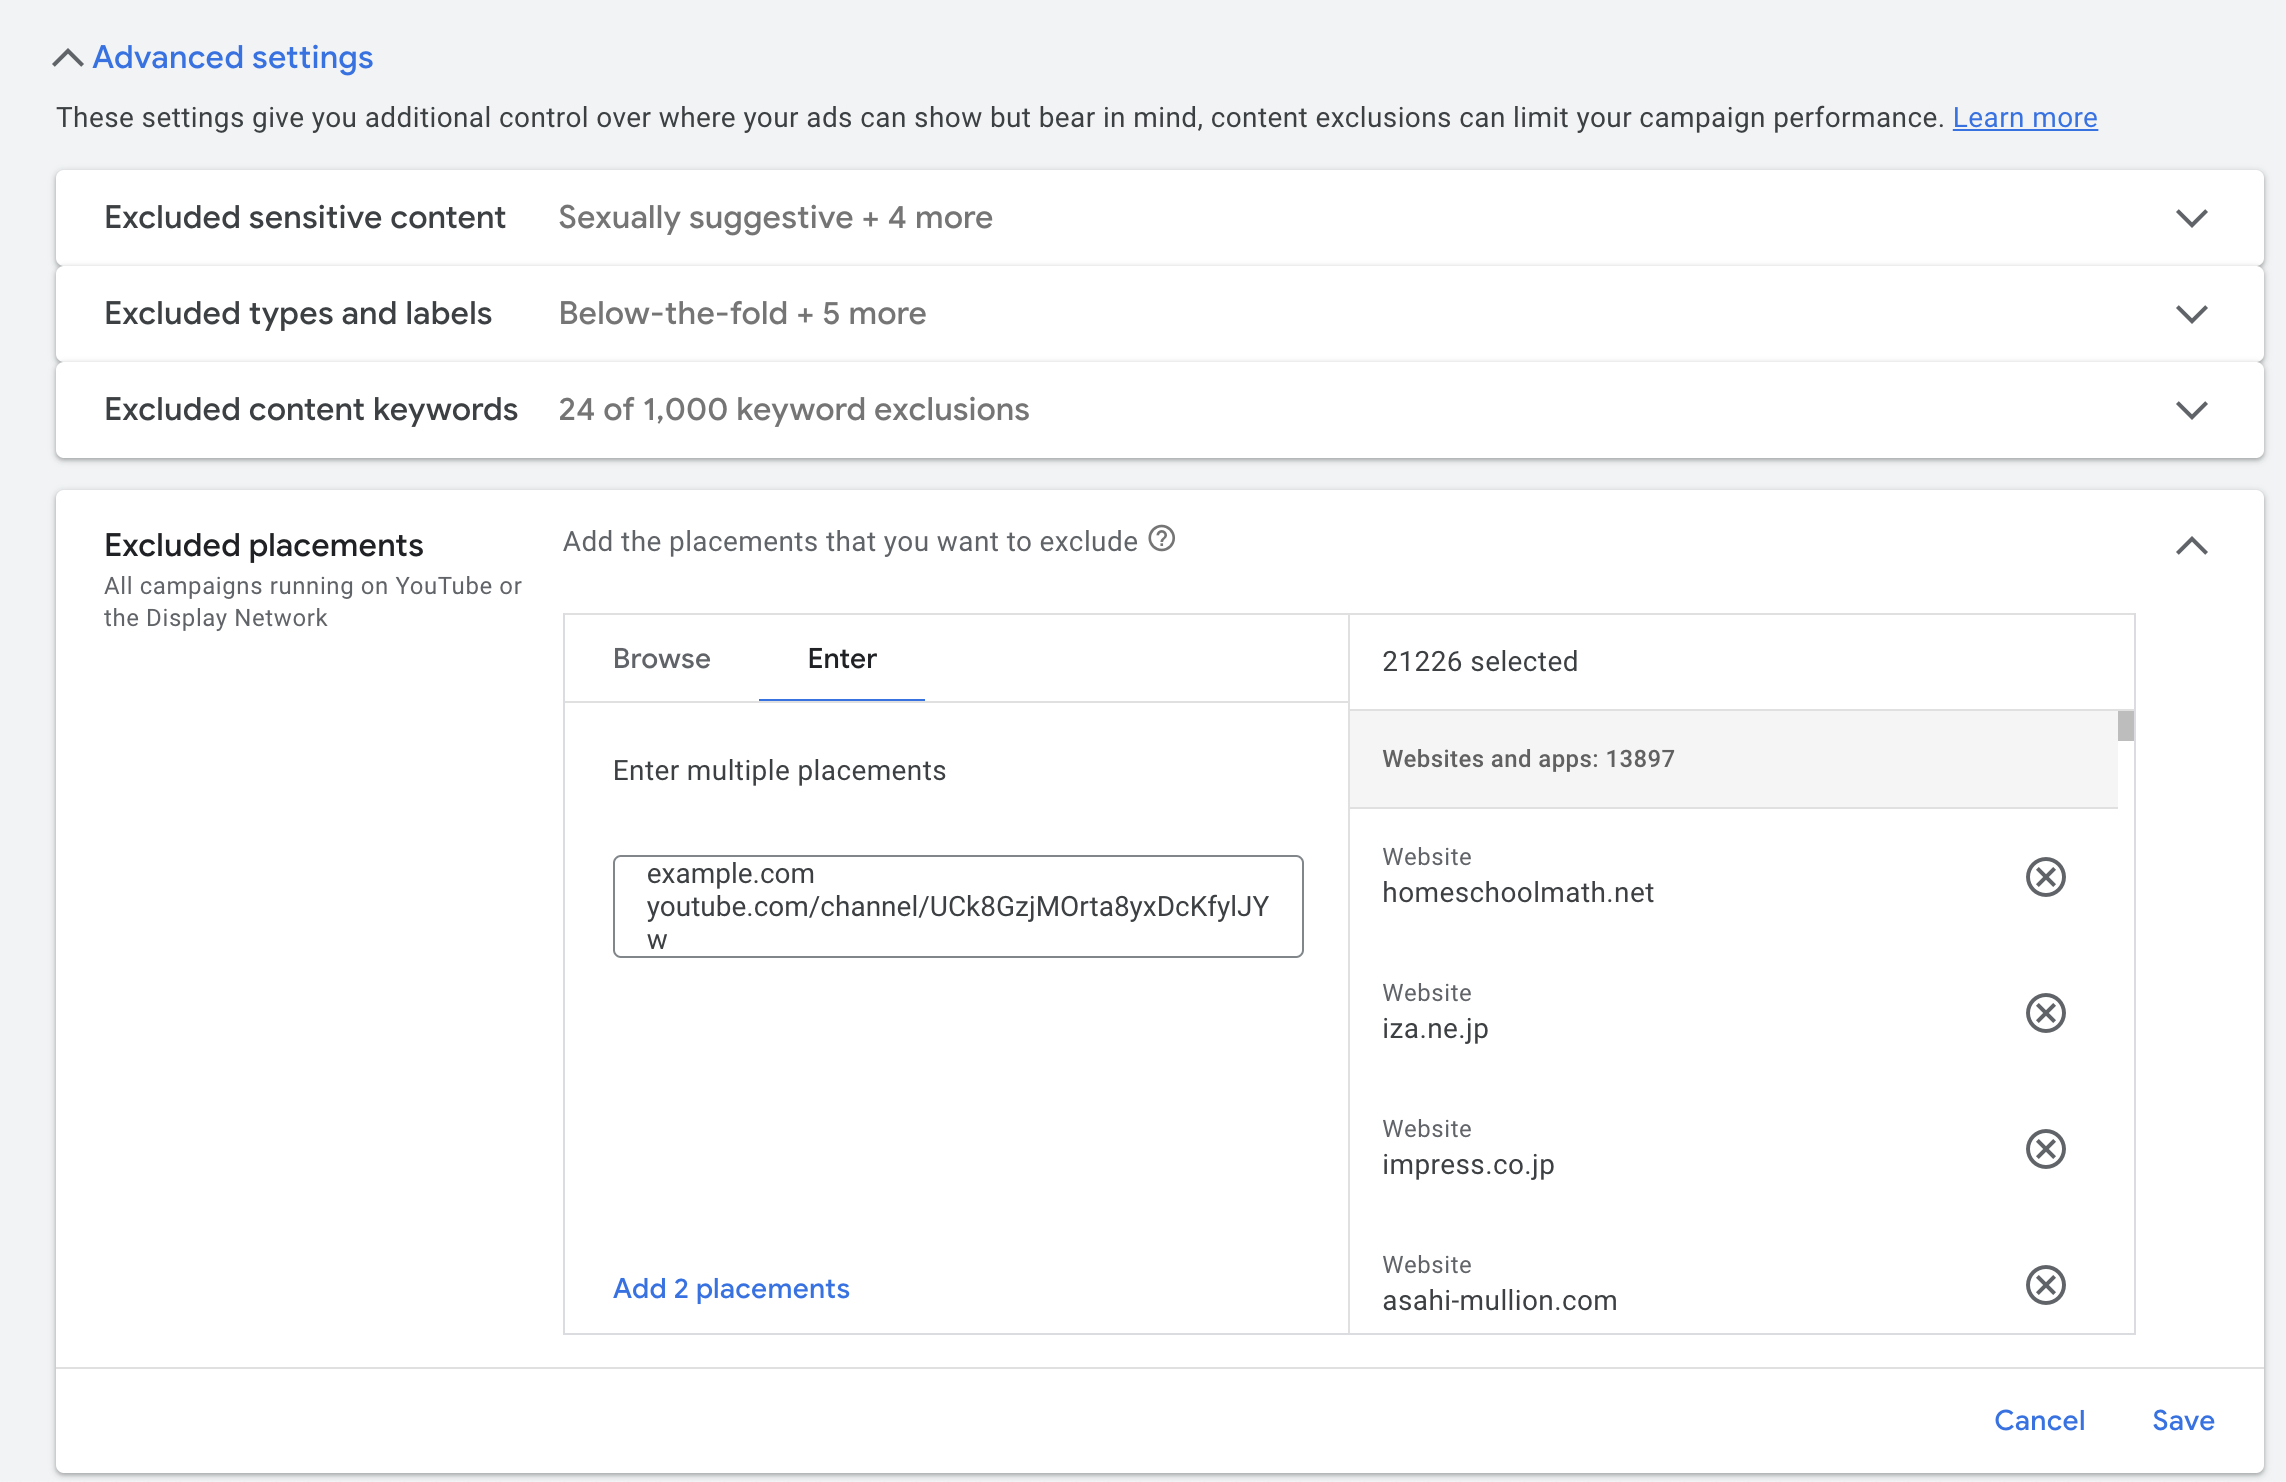
With this method, you will never have to review the same placement more than once. Any blacklisted placements will be excluded from serving ads across all Google networks.
If you need help with something similar to this blog post, then get in touch through my contact page.
Get in touchClosing comments
You cannot manage Content Suitability through the Google Ads API (yet). Content Suitability is not available at the MCC level either. Shared placement exclusion do not work with Performance Max campaigns too.
Google’s placements have always been trash. This way, at least, you can try and make them a little less trash. Enjoy the tarot videos.